Table of Contents >> Show >> Hide
- Before You Start: Butterfly Cake Basics
- Way 1: Make a Butterfly Cake from a Round Cake
- Way 2: Make a Butterfly Sheet Cake
- Way 3: Make Butterfly Cupcakes
- Butterfly Cake Decorating Tips for Better Results
- Common Mistakes to Avoid
- Serving and Storage Tips
- Extra Experience Notes: What Making Butterfly Cakes Teaches You
- Conclusion
A butterfly cake is the kind of dessert that walks into a birthday party and immediately becomes the main character. It is colorful, cheerful, surprisingly flexible, andbest of allit does not require you to own a professional bakery, a degree in sculpture, or a panic room for frosting emergencies. Whether you are planning a spring celebration, a garden-themed birthday, a baby shower, or simply want to turn an ordinary Saturday into “why is there edible glitter on the dog?” day, learning how to make a butterfly cake is a wonderfully useful baking skill.
The beauty of a butterfly cake is that there is no single “correct” way to create one. You can carve a round cake into wings, decorate a sheet cake with a butterfly design, or make charming butterfly cupcakes that look like tiny winged treats ready to flutter off the dessert table. Each method has its own personality. The carved cake is bold and party-ready. The sheet cake is easy, practical, and great for feeding a crowd. The cupcake version is cute, portable, and ideal for kids who believe frosting is a food group.
In this guide, you will learn 3 ways to make a butterfly cake, including practical baking tips, decorating ideas, frosting advice, and small “save yourself from chaos” tricks that experienced home bakers tend to learn the sticky way. We will keep the process simple, colorful, and realisticbecause nobody needs a cake tutorial that requires twelve specialty tools and the emotional strength of a pastry chef during wedding season.
Before You Start: Butterfly Cake Basics
Before we jump into the three methods, let’s talk about the basics that make any butterfly cake look polished instead of “abstract moth after a thunderstorm.” You do not need fancy ingredients, but you do need a good structure, cooled cake, stable frosting, and a plan for color placement.
Choose the Right Cake Base
Vanilla, yellow cake, chocolate cake, strawberry cake, and lemon cake all work beautifully for butterfly cakes. A firm but moist cake is best because it can handle cutting, moving, and frosting without falling apart. If you are using a boxed cake mix, that is perfectly fine. If you are baking from scratch, choose a classic butter cake or sponge-style recipe with enough structure to hold its shape.
For carved butterfly cakes, avoid overly delicate cakes that crumble easily. A soft angel food cake may taste dreamy, but it is not the best candidate for wing surgery. For cupcakes, a light vanilla cupcake works wonderfully because the tops can be cut and placed back as “wings.” For sheet cakes, almost any flavor works because you are decorating the surface instead of cutting the cake into a new shape.
Let the Cake Cool Completely
This is not optional. Warm cake plus frosting equals a dessert landslide. Let your cake cool fully before cutting or decorating. If you are in a hurry, place the cake layers in the refrigerator for a short time after they reach room temperature. Cold cake is easier to cut and frost because it is firmer and less likely to shed crumbs like a nervous golden retriever.
Use the Right Frosting Consistency
Buttercream is one of the best choices for butterfly cake decorating because it can be spread, piped, colored, and shaped. For crumb coating, use a slightly thinner frosting. For piping borders, wing outlines, flowers, dots, and details, use medium or stiff buttercream. If your frosting is too thick, add milk or cream a teaspoon at a time. If it is too soft, add powdered sugar gradually or chill it briefly before piping.
Gel food coloring is usually better than liquid food coloring because it creates stronger colors without adding too much moisture. Pastel pink, lavender, sky blue, lemon yellow, mint green, and coral are classic butterfly cake colors. For a dramatic version, use purple, teal, black, gold, and white accents.
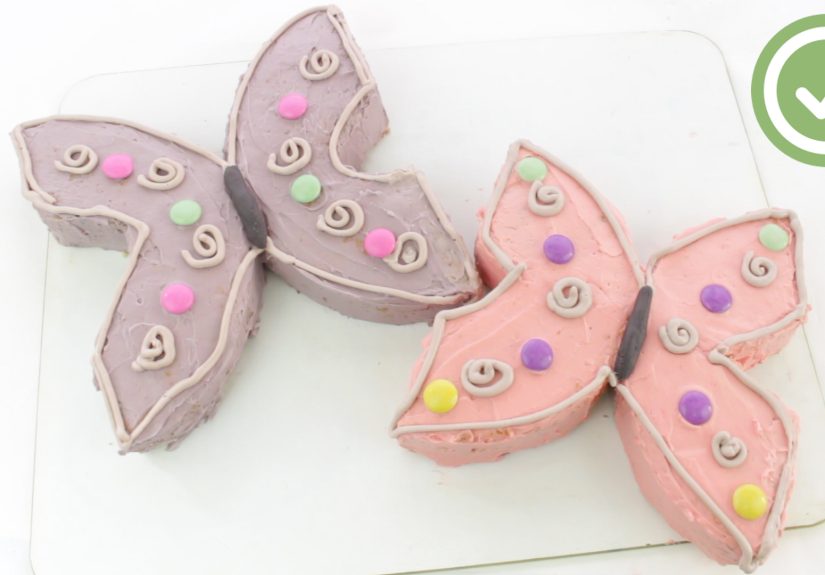
Way 1: Make a Butterfly Cake from a Round Cake
The round-cake method is one of the most popular ways to make a butterfly cake because it turns a simple cake into a shaped centerpiece. It looks impressive, but the cutting pattern is easier than it seems. Think of it as arts and crafts, except you can eat the scraps. A truly superior hobby.
What You Need
- One 8-inch or 9-inch round cake, fully cooled
- Buttercream frosting or your favorite spreadable frosting
- Gel food coloring
- Candy, sprinkles, fruit, or piping gel for decoration
- A serrated knife
- A large serving board or cake board
- Offset spatula or butter knife
- Optional: piping bags and decorating tips
Step-by-Step Instructions
Step 1: Bake and chill the cake. Bake your round cake according to your recipe directions. Once cooled, wrap it and chill it for 20 to 30 minutes. This helps keep the crumbs under control when you cut the butterfly shape.
Step 2: Cut the cake in half. Use a serrated knife to slice the round cake straight down the middle. You now have two semicircles. Congratulations, you are halfway to wings and fully committed.
Step 3: Shape the wings. Place the two halves with the curved sides facing inward or outward, depending on your preferred butterfly shape. For a more classic butterfly silhouette, cut a small triangular notch from the flat side of each half. These notches create the inner wing curves and help the cake look more like a butterfly rather than two cake hills having a meeting.
Step 4: Arrange the pieces. Position the two cake halves on your serving board so they mirror each other. Leave a narrow gap in the center for the butterfly body. You can use a banana, a row of cupcakes, a frosted snack cake, a line of marshmallows, or piped frosting for the body.
Step 5: Apply a crumb coat. Spread a thin layer of frosting over the cake pieces. This seals in crumbs and gives your final frosting coat a smoother finish. Chill the cake for about 15 minutes after crumb coating.
Step 6: Add the final frosting layer. Frost the wings with your base color. Pink, purple, yellow, or blue work beautifully. Smooth the frosting with an offset spatula, but do not worry about perfection. Butterflies in nature are not inspected by cake judges, and neither should your dessert be.
Step 7: Decorate the wings. Add symmetrical designs on both wings. Use candy-coated chocolates, jelly beans, licorice strips, fruit slices, piped dots, rosettes, or edible pearls. Symmetry helps the butterfly look intentional. If you put three purple dots on the left wing, place three purple dots on the right wing too. Your cake deserves balance, even if your kitchen currently does not.
Design Ideas for a Round Butterfly Cake
For a garden-party style, pipe small buttercream flowers along the wing edges and add green leaves. For a child’s birthday cake, use rainbow candies and colorful sprinkles. For a more elegant cake, use pale buttercream, pearl sprinkles, and delicate piped lines. You can also create a monarch-inspired butterfly cake using orange frosting, black outlines, and white dots.
If you want extra flavor, slice the round cake into two layers before shaping it and add a filling such as strawberry jam, lemon curd, chocolate ganache, or vanilla buttercream. Just avoid overfilling, because slippery cake layers can shift when you cut and move them.
Way 2: Make a Butterfly Sheet Cake
A butterfly sheet cake is the practical hero of the dessert world. It feeds a crowd, travels better than a carved cake, and gives you a flat surface for decorating. If the round butterfly cake is the dramatic party centerpiece, the sheet cake is the dependable friend who brings napkins, remembers the candles, and somehow has extra forks.
What You Need
- One 9-by-13-inch sheet cake
- Buttercream frosting or whipped topping
- Food coloring
- Paper butterfly stencil or printed butterfly outline
- Piping bags or zip-top bags
- Sprinkles, sanding sugar, candies, or fruit
- Toothpick or small offset spatula
Step-by-Step Instructions
Step 1: Bake the sheet cake. Prepare your favorite 9-by-13-inch cake. Chocolate, vanilla, funfetti, lemon, and strawberry are excellent options. Let the cake cool completely in the pan if you plan to serve it from the pan, or turn it onto a board if you want a cleaner presentation.
Step 2: Frost the base. Spread a smooth layer of frosting across the entire cake. White, pale blue, or light green makes a great background because it lets the butterfly design stand out. Imagine the frosting as the sky or garden, and the butterfly as the dessert-table diva.
Step 3: Create or place a butterfly outline. You can lightly trace a butterfly shape with a toothpick, use a stencil, or draw freehand. If drawing freehand makes you nervous, print a simple butterfly outline, cut it out, place it gently on top of the chilled frosting, and trace around it with a toothpick.
Step 4: Pipe the outline. Use a piping bag fitted with a small round tip, or snip a tiny corner from a zip-top bag. Pipe the butterfly outline in chocolate frosting, colored buttercream, or piping gel. A darker outline makes the design pop and hides small tracing mistakes. It is basically eyeliner for cake.
Step 5: Fill in the wings. Use colored frosting to fill the wing sections. You can spread it with a small spatula or pipe rows of stars, dots, shells, or rosettes. For beginners, piped stars are very forgiving. If one star looks weird, add twenty more and call it texture.
Step 6: Add details. Decorate the wings with sprinkles, edible glitter, mini candies, or colored sugar. Add a body down the center with piped frosting, chocolate candies, or fruit. Licorice, pretzel sticks, or piped chocolate make easy antennae.
Why the Sheet Cake Method Works So Well
This method is excellent for beginners because you do not have to cut the cake into a complicated shape. It is also great for school parties, family gatherings, and events where neat slicing matters. Every guest gets a square piece of cake, and nobody has to negotiate over who gets the “left wing corner with the extra candy.”
A butterfly sheet cake also gives you more space for writing. You can add a birthday message, a baby shower greeting, or a spring quote. Keep the lettering simple and place it above or below the butterfly so the design remains the star.
Way 3: Make Butterfly Cupcakes
Butterfly cupcakes are classic, adorable, and wonderfully easy to serve. Instead of making one large butterfly, you create individual cupcakes with little cake “wings” on top. This style is especially charming for tea parties, birthday dessert tables, garden celebrations, and bake sales. It also gives every guest their own butterfly, which is excellent news for anyone who does not like sharing frosting real estate.
What You Need
- 12 vanilla or lemon cupcakes
- Buttercream, whipped cream, or stabilized cream filling
- Jam, lemon curd, or fruit preserves
- Powdered sugar for dusting
- Small sharp knife
- Piping bag or spoon
- Optional: sprinkles, berries, edible flowers, or colored sugar
Step-by-Step Instructions
Step 1: Bake the cupcakes. Use your favorite cupcake recipe or cake mix. Vanilla, lemon, almond, and strawberry flavors pair beautifully with fruit fillings and buttercream. Fill cupcake liners about two-thirds full so the cupcakes rise nicely without overflowing.
Step 2: Cool completely. Let the cupcakes cool before cutting. Warm cupcakes are fragile, and the tops may tear instead of lifting cleanly. Patience is hard, but so is explaining why your butterflies look like tiny frosting volcanoes.
Step 3: Cut out the tops. Use a small knife to cut a shallow cone or circle from the top of each cupcake. Do not cut all the way through. Remove the piece and slice it in half. These two halves become the butterfly wings.
Step 4: Add filling. Spoon a small amount of jam, lemon curd, or fruit preserves into the hollow. Then pipe or spoon buttercream or whipped cream on top. The filling adds flavor and helps hold the wings in place.
Step 5: Place the wings. Set the two cake halves into the frosting at an angle, cut sides facing outward or inward depending on the look you prefer. They should resemble open butterfly wings.
Step 6: Finish with style. Dust the cupcakes with powdered sugar, add sprinkles, or pipe a small line of frosting down the center as the body. For a colorful party tray, tint the frosting in several pastel colors and alternate them across the cupcakes.
Flavor Combinations for Butterfly Cupcakes
Try vanilla cupcakes with strawberry jam and vanilla buttercream for a classic flavor. Lemon cupcakes with lemon curd taste bright and springy. Chocolate cupcakes with raspberry filling are rich and dramatic. Almond cupcakes with cherry preserves feel slightly fancy, like they might wear pearls to brunch.
If you use whipped cream, remember that it is softer and more perishable than buttercream. Keep the cupcakes chilled until serving, especially in warm weather. Buttercream is sturdier for parties where the desserts may sit out for a little while.
Butterfly Cake Decorating Tips for Better Results
Use a Crumb Coat
A crumb coat is a thin layer of frosting that traps loose crumbs before the final coat goes on. This is especially helpful for shaped cakes, chocolate cakes, and cakes that have been cut. Chill the crumb-coated cake briefly before adding the final frosting layer.
Work with Symmetry
Butterfly designs look best when both wings match. They do not have to be mathematically perfect, but similar colors and patterns on each side make the cake feel polished. If you pipe a swirl on one wing, pipe a matching swirl on the other. If you add candy dots, count them out before placing them so one wing does not look like it raided the candy bowl alone.
Practice Piping First
Before piping directly onto the cake, practice on parchment paper or a plate. Try dots, stars, shells, lines, and small flowers. Scrape the frosting back into the bag if it is still clean. This low-pressure practice helps you get comfortable with the motion before decorating the actual cake.
Keep Colors Under Control
A butterfly cake can be colorful without becoming visually chaotic. Choose three to five main colors, then repeat them across the design. For example, use pink, purple, yellow, and white. Or try blue, teal, lavender, and silver. Too many colors can make the cake look busy, although children may disagree strongly and vote for “all the sprinkles, everywhere, immediately.”
Chill When Needed
If your frosting becomes too soft, place the cake or piping bag in the refrigerator for a short rest. Warm hands, warm rooms, and soft buttercream can make details droop. Chilling helps frosting firm up and gives you more control.
Common Mistakes to Avoid
Decorating a Warm Cake
This is the fastest route to sliding frosting. Always cool the cake completely before decorating. A warm cake may smell amazing, but it is not ready for buttercream clothing.
Using Too Much Filling
Filling is delicious, but too much can make layers slide or cupcakes collapse. Use a thin, even layer for shaped cakes and a small spoonful for butterfly cupcakes.
Skipping the Cake Board
A shaped butterfly cake is easier to move and serve when arranged on a sturdy board or platter. Do not assemble it on a flimsy paper plate unless you enjoy suspense.
Overloading the Wings
Candy, fruit, and decorations add charm, but heavy toppings can pull at soft frosting or make delicate cake pieces break. Use heavier decorations near the center and lighter details toward the edges.
Serving and Storage Tips
Buttercream-frosted cakes can usually sit at cool room temperature for a short party window, but cakes with whipped cream, cream cheese frosting, custard, or fresh fruit fillings should be refrigerated. Store leftovers in a covered container to keep the cake moist and protect it from refrigerator odors. Nobody wants butterfly cake with a suspicious hint of leftover onion.
For clean slices, chill the cake briefly before cutting and use a sharp knife. Wipe the knife between slices if you want neat presentation. Cupcakes are the easiest option for serving because no slicing is required. Just place them on a tray and watch them disappear with suspicious speed.
Extra Experience Notes: What Making Butterfly Cakes Teaches You
Making a butterfly cake is more than following a cute dessert trend. It teaches you how small decorating decisions can completely change the personality of a cake. The first time you make one, you may focus mostly on getting the shape right. By the second attempt, you start thinking about color balance, wing patterns, frosting texture, and how to create movement with piped lines. By the third attempt, you may find yourself standing in the baking aisle comparing sprinkle shapes like a person with a very specific destiny.
One of the biggest lessons is that simple designs often look better than complicated ones. Beginners sometimes try to add every decoration they own: candies, glitter, flowers, writing, borders, stars, dots, and possibly a small edible weather system. But butterfly cakes benefit from visual breathing room. A clean outline, repeated wing pattern, and thoughtful color palette usually look more professional than a cake covered edge-to-edge with random decorations.
Another practical experience is learning how much cake temperature matters. A chilled cake behaves politely. It cuts neatly, holds its shape, and accepts frosting like a civilized dessert. A warm cake, on the other hand, has opinions. It crumbles, smears, and turns buttercream into a glossy puddle. If you are making a butterfly cake for an event, bake the cake earlier in the day or the night before. Decorating becomes much easier when you are not racing against steam, crumbs, and your own rising blood pressure.
Butterfly cupcakes are especially useful for building confidence. They teach the basics of cutting, filling, and arranging without the pressure of decorating one large centerpiece. If one cupcake looks odd, it is not a disaster; it is “the quirky butterfly.” Place it in the middle of the tray and pretend it was intentional. Cupcakes also let you test flavor combinations. You might discover that lemon curd and vanilla buttercream are a sunshine-level pairing, or that raspberry jam makes chocolate cupcakes taste like they dressed up for a fancy party.
The sheet cake method teaches planning. Since the top is flat, the design depends on spacing and outline. It helps to sketch the butterfly on paper first or trace lightly with a toothpick before piping. This prevents the classic problem of starting with giant wings and realizing there is no room left for the body. A cake should not look like the butterfly forgot its torso.
The carved round cake method teaches flexibility. Even if your cuts are not perfectly even, frosting can fix a lot. Buttercream is basically delicious spackle. A border hides rough edges. Candy covers uneven spots. Piped stars disguise crumbs. Once decorated, the cake becomes charming because handmade desserts have personality. That little uneven wing? Character. That slightly crooked antenna? Whimsy. That smudge near the bottom? A strategic sprinkle location.
Finally, butterfly cakes remind you that baking should be fun. Yes, good technique helps. Yes, neat frosting is satisfying. But the real goal is to create something joyful and memorable. When a child sees a butterfly birthday cake, they are not checking whether your piping angle was exactly 90 degrees. They are thinking, “That cake has wings,” which is frankly a pretty strong review. Make the cake, enjoy the process, laugh at the messy parts, and serve it proudly.
Conclusion
Learning 3 ways to make a butterfly cake gives you options for almost any celebration. A round butterfly cake makes a bold centerpiece, a butterfly sheet cake is simple and crowd-friendly, and butterfly cupcakes are sweet, portable, and charming. With a cooled cake, stable frosting, a little symmetry, and a playful color palette, you can create a dessert that looks festive without requiring professional-level decorating skills.
The best butterfly cakes are cheerful, creative, and made with a sense of fun. Start with the method that fits your comfort level, then add your own colors, flavors, and finishing touches. Whether your final cake looks like a delicate garden butterfly or a sugar-powered cartoon insect, it will bring smilesand probably a few requests for seconds.


