Table of Contents >> Show >> Hide
- Quick 60-Second Diagnosis (So You Don’t “Fix” the Wrong Thing)
- Before You Start: Tools, Supplies, and a Tiny Bit of Safety
- Way #1: Fix the Friction (Loosen, Realign, and Clean the Handle Mount)
- Way #2: Fix the Chain & Flapper Hang-Ups (The Most Common “Stuck Down” Cause)
- Way #3: Replace the Toilet Handle (Flush Lever) Assembly
- When to Call a Plumber (a.k.a. “When DIY Stops Being Fun”)
- Wrap-Up: The 3 Fixes in One Breath
- Real-World Experiences: “Stuck Handle” Stories & What They Teach (Extra)
A stuck toilet handle is the bathroom equivalent of a car alarm that won’t shut up: it’s loud, annoying, and your wallet can practically hear the water bill climbing.
The good news? A toilet handle isn’t a mysterious machine powered by ancient plumbing spirits. It’s a simple lever, a chain, and a flapperthree parts that can only misbehave in so many ways.
In this guide, you’ll learn three reliable DIY fixes for a toilet handle that sticks, won’t spring back, hangs down, or needs that dreaded “jiggle.” We’ll keep it practical,
a little funny, and very focused on getting your toilet back to flushing like it has somewhere to be.
Quick 60-Second Diagnosis (So You Don’t “Fix” the Wrong Thing)
Pop the tank lid off and set it somewhere safe (porcelain is not known for its bounce). Then do one test flush and watch what happens inside the tank.
Your “stuck handle” usually falls into one of these buckets:
- The handle feels stiff and doesn’t return to its normal position.
- The handle stays down and the toilet keeps running like it’s training for a marathon.
- The handle moves but the flapper barely lifts (weak flush), or the chain gets tangled.
Once you know whether the problem is friction at the handle, a chain/flapper issue, or a worn handle assembly, the fix becomes fastand blessedly cheap.
Before You Start: Tools, Supplies, and a Tiny Bit of Safety
Most stuck-handle fixes take 10–25 minutes. You typically don’t need to shut off the water for minor adjustments, but if you’ll be removing parts (Method #3),
turning off the shutoff valve is a smart, low-drama move.
Tools & supplies (pick what matches your situation)
- Adjustable wrench or slip-joint pliers
- Small screwdriver (optional)
- Towel (for drips and for placing the tank lid)
- Cleaning cloth + mild bathroom cleaner
- White vinegar (helpful if hard-water mineral buildup is involved)
- Silicone plumber’s grease (optional for squeaky pivotsavoid anything that damages rubber)
- Replacement toilet handle/flush lever (if you’re doing Method #3)
Important: Toilet handle mounting nuts are often reverse-threaded (left-hand threads). That means the direction you “expect” can be wrong.
If you crank the wrong way like you’re opening a pickle jar, you can crack the tank. We will talk about the correct directiontwicebecause toilets are expensive and pickles are not.
Way #1: Fix the Friction (Loosen, Realign, and Clean the Handle Mount)
If your handle feels stiff, sticks in the down position, or doesn’t bounce back after a flush, the most common culprit is binding at the handle’s mounting point.
Translation: the handle is rubbing, the nut is too tight, or mineral buildup is acting like invisible sandpaper.
Step-by-step
-
Check for obvious interference. Is the handle arm inside the tank hitting the fill valve, the overflow tube, or the tank wall?
If the arm is colliding with anything, it can get “stuck” mid-motion. -
Loosen the handle mounting nut slightly.
Inside the tank, find the plastic or metal nut holding the handle in place. On many toilets it’s reverse-threaded:
turn clockwise to loosen and counterclockwise to tighten.
Loosen it just a quarter-turn at a timetiny moves make a big difference. -
Reposition the handle so it rests naturally.
The outside handle should sit level (not drooping). If it’s installed crooked, the lever inside can bind.
Hold the handle in the “neutral” resting position while you snug the nut back down. -
Clean the area around the handle opening.
Wipe away grime and mineral crust around the hole in the tank and the handle’s shaft. If you have hard-water buildup,
soak a rag in white vinegar, wrap it around the area for 10–15 minutes, then scrub gently. -
Test flush and fine-tune.
Put the lid back on loosely (or just keep it off for testing), flush a few times, and adjust the nut in tiny increments
until the handle moves smoothly and returns to normal.
Signs you nailed it
- The handle springs back without needing a “jiggle.”
- The toilet stops running promptly after a flush.
- The handle doesn’t feel like it’s dragging through peanut butter.
If the handle still sticks: move to Way #2. Even a perfectly mounted handle can misbehave if the chain or flapper is setting little booby traps inside the tank.
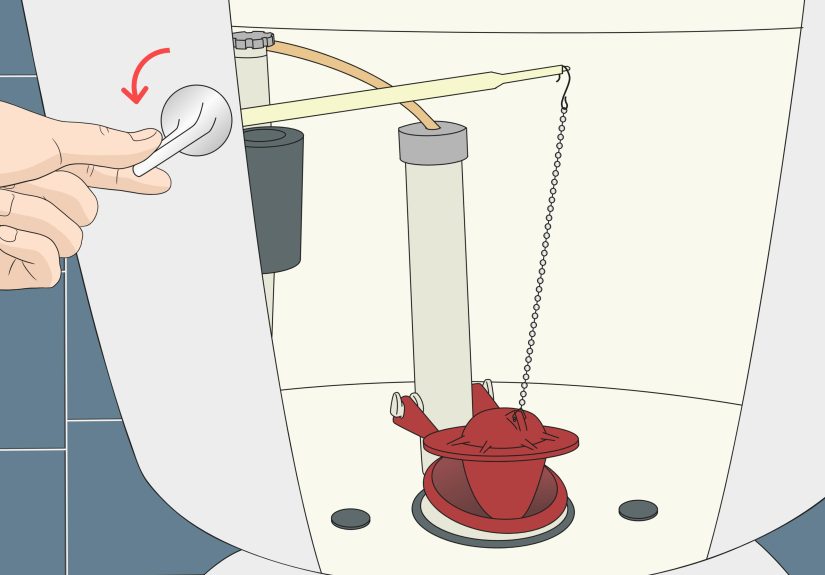
Way #2: Fix the Chain & Flapper Hang-Ups (The Most Common “Stuck Down” Cause)
A toilet handle can feel “stuck” when the handle itself is finebut the chain is too tight, too loose, tangled, or getting sucked under the flapper.
This can cause two classic headaches:
- Handle sticks down because the chain is pulling awkwardly or snagging.
- Toilet keeps running because the flapper can’t settle back onto its seat.
What “good chain length” looks like
When the toilet is at rest, you want a little slacknot a droopy necklace and not a guitar string.
A good rule of thumb is roughly 1–2 chain links of slack (or a gentle “J” shape), so the flapper can fully close,
but the handle still lifts the flapper quickly when you flush.
Step-by-step
-
Unhook the chain from the lever arm.
It usually clips into one of several holes on the handle’s arm. Take note of which hole you started with. -
Adjust slack.
Reattach the chain so it has slight slack at rest. If your toilet has multiple holes on the lever arm,
moving the chain to a different hole can change leverage and lift height. -
Look for tangles and “under-flapper” snags.
If extra chain dangles, it can get pulled under the flapper during a flush, preventing a proper seal.
If you see a lot of extra chain, remove links (or clip excess if it’s designed for it). -
Try the “straw sleeve” trick if the chain keeps misbehaving.
If the chain repeatedly gets sucked into the flapper area, slide the chain through a short piece of plastic straw
(cut to length) to stiffen it. This simple hack can keep the chain from folding into the wrong place mid-flush. -
Inspect the flapper itself.
If it’s warped, slimy, brittle, or not seating cleanly, it can cause running and make you think the handle is the problem.
Clean the flapper seat area and replace the flapper if it won’t seal reliably.
Test it like a pro
Do three test flushes:
- Flush #1: normal press-and-release. The flapper should lift and drop cleanly.
- Flush #2: watch the chain path. It should not wrap around the overflow tube or snag.
- Flush #3: listen for the refill to stop. If water keeps running, the flapper may still be held open or not sealing.
If you can’t get consistent results even after adjusting slack and clearing snags, the lever may be worn or bent.
That’s your cue for Way #3.
Way #3: Replace the Toilet Handle (Flush Lever) Assembly
Sometimes the handle isn’t stuckit’s just tired. Plastic can strip, metal can corrode, and pivots can wear out.
If your handle feels crunchy, wobbly, visibly cracked, or keeps binding no matter what you do, replacing the flush lever assembly is usually the cleanest win.
What to buy (so you don’t end up with the “almost right” handle)
- Mounting position: front-mount vs. side-mount (and whether it’s left- or right-hand oriented).
- Arm style: standard straight, angled, or adjustable/universal.
- Finish: optional, but if your bathroom has a theme, this is your moment.
Pro move: take a quick photo of your current setup (inside the tank) before removing anything. It’s a 10-second insurance policy against “Wait… where did this clip go?”
Step-by-step replacement
-
Turn off the water (recommended).
Use the shutoff valve behind the toilet (turn clockwise) and flush once to lower the water level in the tank.
You don’t have to fully drain the tank for a handle swap, but less water = less splash drama. -
Remove the tank lid and unhook the chain.
Disconnect the chain from the lever arm. -
Loosen the mounting nut (remember: reverse thread is common).
Inside the tank, loosen the nut holding the handle. On many toilets you’ll turn clockwise to loosen.
Go slowly and avoid brute force. -
Pull the old handle out.
Slide the lever arm out through the hole in the tank. -
Clean around the handle opening.
Wipe the area so the new handle sits flush and doesn’t bind. -
Install the new handle and hand-tighten first.
Insert the new lever arm through the hole, align the outside handle in a natural resting position, then thread the nut on by hand.
Once it’s snug, use a wrench for a gentle final tighten. Do not overtightenporcelain tanks can crack. -
Reconnect the chain with proper slack.
Attach the chain to the same hole you started with, then adjust if the flush is weak or the flapper doesn’t close fully. -
Turn water back on and test.
Run several test flushes and confirm the handle returns normally and the toilet stops running promptly.
Common replacement mistakes (and how to avoid them)
- Nut is too tight: causes binding and sticking. Back off slightly and retest.
- Wrong handle orientation: the arm sits at a weird angle and hits internal parts. Swap for the correct left/right or universal model.
- Chain is too tight: flapper won’t seal; toilet runs. Add slack.
- Chain is too loose: flapper barely lifts; weak flush. Remove slack.
When to Call a Plumber (a.k.a. “When DIY Stops Being Fun”)
A stuck handle is usually a simple DIY fix. But call a pro if:
- You see cracks in the tank or you hear a “tink” that makes your soul leave your body.
- The shutoff valve won’t turn, leaks, or looks like it’s one twist away from becoming a fountain.
- The toilet keeps running after you’ve adjusted the chain and replaced the flapper.
- Multiple parts inside the tank are failing at once (handle, flapper, fill valve), and you’d rather not play plumbing whack-a-mole.
Wrap-Up: The 3 Fixes in One Breath
If your toilet handle is stuck, start with the simplest path: reduce friction at the handle mount (Way #1),
then dial in the chain and flapper (Way #2), and if the parts are worn or bent, replace the handle assembly (Way #3).
Most fixes cost less than a pizza and take less time than deciding what pizza to order.
Real-World Experiences: “Stuck Handle” Stories & What They Teach (Extra)
People don’t usually brag about their toilet repairs. Nobody posts, “Just optimized my flapper chain slack, feeling blessed.” But if you listen to enough homeowner
stories, you start noticing patternslike how the same tiny mistakes can keep bringing the same annoying problem back.
One of the most common experiences is what I call “The Polite Guest Press”: someone holds the handle down longer than necessary because they think it
makes the flush stronger. Some toilets forgive that. Others respond by letting the chain slip into a weird angle or by pulling the flapper up just long enough to
make the handle feel sticky afterward. The lesson: a modern toilet is designed for press and release. If the toilet needs a long hold to flush well, the real
fix is usually inside the tankoften chain length, flapper condition, or the handle arm geometrynot “press harder like you’re launching a rocket.”
Another classic scenario shows up in areas with hard water: the handle doesn’t break, it just gradually becomes more stubborn. Homeowners describe it as feeling
“gummy” or “gritty.” That’s often mineral buildup turning smooth movement into a low-budget sanding job. In these cases, people sometimes replace the handle first
and sure, that can workbut the smarter experience-based approach is to clean and de-scale around the mounting area and check for rub points.
A little vinegar and a quick wipe can restore smooth movement and keep the new handle from suffering the same fate.
Then there’s the experience renters know well: the chain that won’t behave. You adjust it, it works for a day, then somehow it’s tangled again.
Often the chain is simply too long, and the extra links swing like a tiny metal jump rope until they get caught under the flapper. People will swear the handle is
haunted. It’s not hauntedit’s just over-accessorized. Cutting the excess chain (or re-clipping it so it can’t dangle) is the boring fix that feels like magic.
And if the chain still wants to wander, the straw-sleeve trick can be the difference between “fixed” and “fixed for real.”
One more experience that comes up a lot: the overtightening saga. Someone notices the handle is a little loose, grabs pliers, and tightens the nut
like they’re securing a spaceship hatch. The handle feels soliduntil it starts sticking. That’s the trap. Too tight can cause binding, and with porcelain tanks,
“too tight” is also flirting with an expensive crack. The better habit is a gentle snug, test flush, and micro-adjustment. Think “tuning a guitar,” not “changing a tire.”
Finally, a surprisingly common story: the homeowner replaces the handle and the problem gets worse. Why? Wrong orientation. Toilet handles aren’t always universal.
A left-side mount lever can sit at an awkward angle if you install a right-hand model, causing the arm to hit internal parts or pull the chain sideways.
The experience-based takeaway is simple: before buying, look at where the handle mounts (front vs. side, left vs. right) and match itor buy a truly
adjustable universal lever designed to fit multiple positions.
If you’ve dealt with a stuck handle before, you already know the emotional arc: mild annoyance, then “Why is it still running?”, then sprinting back to the bathroom
like you’re defusing a very wet bomb. The upside is that once you fix it properlyfriction, chain slack, or a fresh leverthe problem usually stays fixed for years.
And you get the quiet satisfaction of winning a small, meaningful battle against household chaos.


